In the previous section, we added the ability to display a small preview of OSLC4JBugzillailla bugs in the NinaCRM application. Now, we’ll take it a step further and allow our support reps to create and select bugs in NinaCRM.
Introduction to OSLC Delegated UI
OSLC Delegated UI is a way for a web application to provide a UI for creating and selecting resources, one that can be used by other web applications.
To explain why it’s called “Delegated” UI, consider our example: we want the NinaCRM system to be able to create and select bugs managed by the separate OSLC4JBugzillailla system; however, we do not want to create a new UI to collect the information or duplicate OSLC4JBugzillailla’s methods of checking that the information is valid. Instead, we want to delegate the creation and selection of bugs to the OSLC4JBugzillailla system.
By using Delegated UI, Nina will enable support reps to add links from Incidents to bugs without leaving the comfort of the CRM system.
The mechanics of Delegated UI
Earlier in this tutorial, we walked through an implementation of Delegated UIs for OSLC4JBugzillailla, both for selecting bugs and creating new bugs. In addition to providing the UI and handling the results, the OSLC4JBugzillailla adapter (or any other OSLC provider application) announces in its Service Provider Documents the URL location and recommended size of the UI.
The application that wants to use the Delegated UI (the OSLC Consumer) creates an <iframe> for the Delegated UI so that the user can interact with it. The Consumer application must also listen to the <iframe> do something with the results of the user’s actions.
You can learn more about Delegated UI in the OSLC Primer.
Parsing the Service Provider Documents
Note: The NinaCRM sample application does not retrieve a Service Provider document and parse its contents to locate Delegated UIs; for simplicity, the URLs for the delegated UIs are hard-coded in the index.jsp file.
A better implementation would be one that properly parses the Service Provider and thus could work with any OSLC Provider.
As we noted when we implemented Service Providers and Catalogs, one of the cores of OSLC is that clients should not have to hard-code any URLs other than a Service Provider Catalog. Clients should be able to parse the Catalog and navigate from the Catalog to the Service Providers; the Service Providers will then expose the available OSLC services.
If you’d like to follow along with a real Service Provider Catalog or Service Provider, see the “Viewing the machine-readable formats of a Service Provider Catalog” section near the bottom of this section.
Below is a part of a sample RDF/XML representation of a Service Provider that exposes both a Delegated UI for selection (<oslc:selectionDialog>) and a Delegated UI for Creation (<oslc:creationDialog >):
<?xml version="1.0" encoding="UTF-8" standalone="no"?>
<rdf:RDF
   xmlns:rdf="http://www.w3.org/1999/02/22-rdf-syntax-ns#"
   xmlns:dcterms="http://purl.org/dc/terms/"
   xmlns:oslc="http://open-services.net//ns/core#">

   <oslc:ServiceProvider rdf:about="http://localhost:8080/OSLC4JBugzilla/services">  <!-- (1)-->
      <dcterms:title>Service Provider Catalog</dcterms:title>
      <dcterms:description>
        Simple OSLC Reference Implementation (SORI) for Change Management Service Document
      </dcterms:description>

      <!-- etc. etc. etc. omitted everything up to oslc:service property -->

      <oslc:service>  <!-- (2)-->
        <oslc:Service>
           <oslc:domain rdf:resource="http://open-services.net//ns/cm#"/>

        <!-- etc. etc. etc. omitted everything Delegated UI information -->

           <oslc:selectionDialog>  <!-- (3)-->
              <oslc:Dialog>
                <dcterms:title>CM Resource Selector</dcterms:title>
                <oslc:label>Picker</oslc:label> <!-- (4)-->
                <oslc:dialog  <!-- (5)-->
                   rdf:resource="http://10.0.1.3:8080/OSLC4JBugzilla/services/1/changeRequests/selector"/>
                <oslc:hintHeight>325px</oslc:hintHeight> <!-- (6)-->
                <oslc:hintWidth>525px</oslc:hintWidth>
                <oslc:resourceType  <!-- (7)-->
                   rdf:resource="http://open-services.net//ns/cm#ChangeRequest"/>
                <oslc:usage rdf:resource="http://open-services.net//ns/core#default"/>
              </oslc:Dialog>
           </oslc:selectionDialog>

           <oslc:creationDialog> <!-- (8)-->
              <oslc:Dialog>
                <dcterms:title>CM Resource Creator</dcterms:title>
                <oslc:label>Creator</oslc:label>
                <oslc:dialog rdf:resource=
                   "http://10.0.1.3:8080/OSLC4JBugzilla/services/1/changeRequests/creator"/>
                <oslc:hintHeight>375px</oslc:hintHeight>
                <oslc:hintWidth>600px</oslc:hintWidth>
                <oslc:resourceType rdf:resource=
                   "http://open-services.net//ns/cm#ChangeRequest"/>
                <oslc:usage rdf:resource="http://open-services.net//ns/core#default"/>
              </oslc:Dialog>
           </oslc:creationDialog>
        </oslc:Service>
      </oslc:service>

  </oslc:ServiceProvider>
</rdf:RDF>
Note that both of the delegated UIs have a URL location (rdf:resource) and suggested sizes for the dialogs (<oslc:hintHeight> and <oslc:hintWidth>).
Since we now know this information, we can add delegated UIs to the NinaCRM application.
Adding Delegated UI dialogs to the NinaCRM
To follow along, start the NinaCRM application and the Bugzilla Adapter application. Open the sample NinaCRM incident page at http://localhost:8181/ninacrm/.
The HTML and JavaScript for the incident page are in the file index.jsp in /src/main/webapp/.
Buttons to launch the dialogs
First, we add two buttons to the HTML code of the incident page.
In the index.jsp file, search for the comment Add link via OSLC Delegated Picker. There you’ll find the HTML for the buttons:
<button id="selectDefectButton" type="button"
  dojoType="dijit.form.Button" onclick="selectDefect()">
  Select Defect to Link to...
</button>

<button id="createDefectButton" type="button"
  dojoType="dijit.form.Button" onclick="createDefect()">
  Create Defect to Link to...
</button>
Note that each button uses the Dojo/Dijit button framework and launches a JavaScript method when clicked.
Next, we add the selectDialog() and createDialog() JavaScript methods.
The following methods use only the Post Message Protocol from the OSLC specification and will accordingly only work in newer browsers. To support older browsers, you should also implement the Window Name protocol. For more information, see the OSLC Core Specification and our our implementation of Delegated UIs.
Because the end-result of both actions is the same – we will be adding a link to either a new or existing bug in Bugzilla – both methods invoke the same postMessageProtocol() method with the appropriate URL:
function selectDefect() {
  postMessageProtocol(selectDialogURL);
}

function createDefect() {
  postMessageProtocol(createDialogURL);
}
Here’s the postMessageProtocol() method that our buttons invoke:
var iframe;
function postMessageProtocol(dialogURL) {
  // Step 1
  dialogURL += '#oslc-core-postMessage-1.0';

  // Step 2
  var listener = dojo.hitch(this, function (e) {
    var HEADER = "oslc-response:";
    if (e.source == iframe.contentWindow && e.data.indexOf(HEADER) === 0) {
      // Step 4
      window.removeEventListener('message', listener, false);
      destroyFrame(iframe);
      handleMessage(e.data.substr(HEADER.length));
    }
  });
  window.addEventListener('message', listener, false);

  // Step 3
  iframe = document.createElement('iframe');
  iframe.width = 500;
  iframe.height = 375;
  iframe.src = dialogURL;

  // Step 4
  displayFrame(iframe);
  container.appendChild(iframe);
};
Here’s how it works:
- First, we add the hash
#oslc-core-postMessage-1.0to the dialog URLs; this will tell the OSLC Provider application that we’re using the Post Message protocol to communicate with the iframe. - We add an event listener that listens for a
postMessageresponse with anoslc-responseheader and then invokes thehandleMessage()method (see below) - We create an
iframeelement with the content of the dialog URL. - We then display the
iframeelement with thedisplayFrame()method (see below).
Here’s the displayFrame() method, which is basically a wrapper for the Dojo/Dijit dialog method:
var dialog;
function displayFrame(frame) {
  if (!dialog) dialog = new dijit.Dialog();
  dialog.setContent(frame);
  dialog.show();
}
And here is the handleMessage() method, which evaluates the returned JSON representation of a bug for the URL and title:
function handleMessage(message) {
  var json = message.substring(message.indexOf("{"), message.length);
  var results = eval("(" + json + ")");
  var linkname = results["oslc:results"][0]["oslc:label"];
  var linkurl = results["oslc:results"][0]["rdf:resource"];
  addLink(linkname, linkurl);
}
Finally, we add a link to the page with the addLink() method:
function addLink(linkname, linkurl) {
  dojo.xhrPost( {
    url: "http://"+hostname+":8181/ninacrm/data",
    headers: { "Content-Type": "application/x-www-form-urlencoded" },
    postData: "linkname=" + linkname + "&linkurl=" + linkurl,
    load: function(data) {
      status("Added link!");
      var li = document.createElement("li");
      li.innerHTML = "<a href='" + linkurl + "' onclick='showPreview()'>" + linkname + "</a>";
      var ul = dojo.byId("linkList").appendChild(li);
      addPreviewMouseOverHandlers();
    },
    error: function (error) {
      status("Error adding link!");
    }
  });
}
The addLink() method sends the title and URL of the bug to the /ninacrm/data service, which adds the information to the database. If successful, we add the link to the <ul id="linkList"> element under the Related Links header.
Throughout the process, we update a status message with the status() method:
function status(msg) {
  document.getElementById("status").innerHTML = msg;
}
Results
With all these in place, you should now be able to add links to our incident pages with delegated OSLC dialogs.
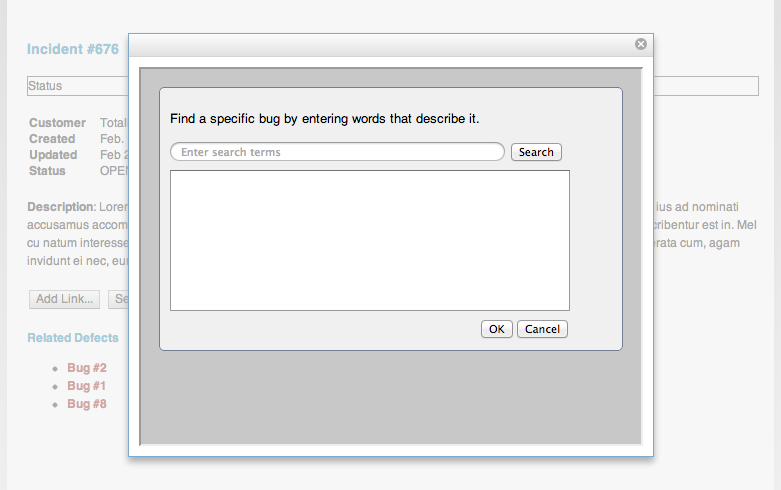
Here’s the dialog for selection:
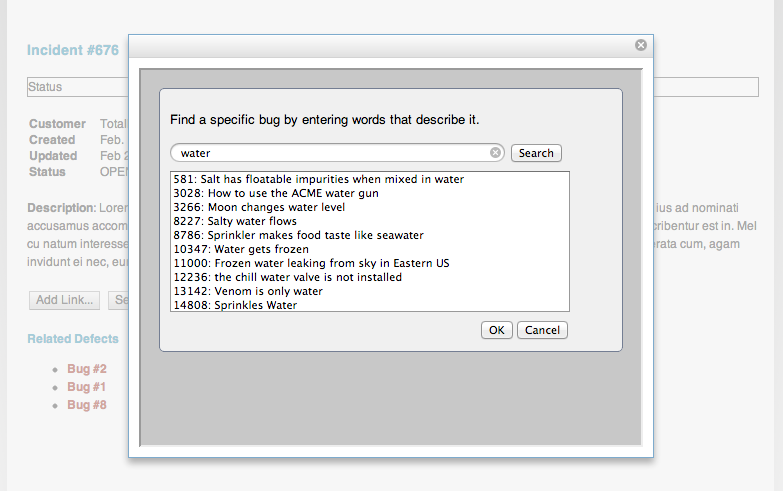
You can search for bugs directly:
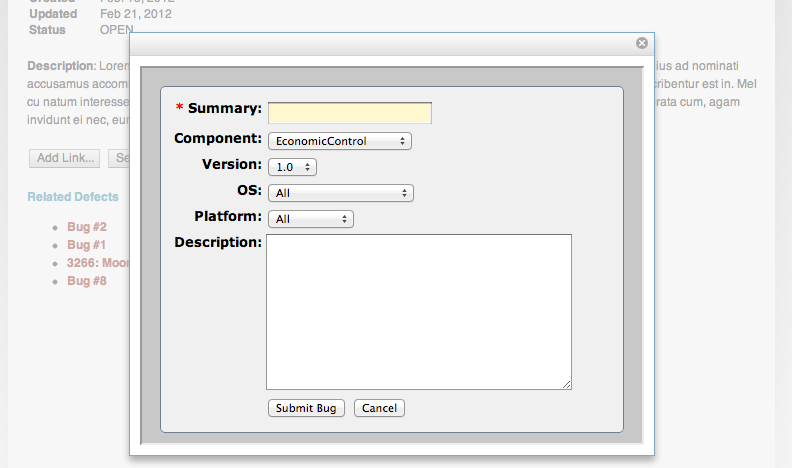
You can also create new bugs right from the page:
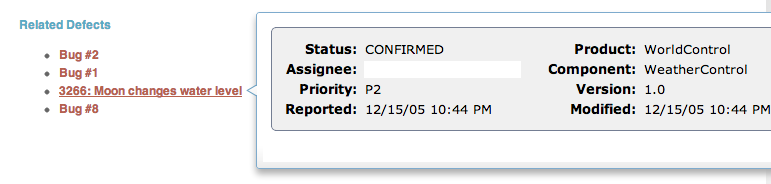
Either way, the new or selected bug appears on the page (complete with the ability to see a UI preview of the bug):
At this point, we’ve completed our first milestone goals: the CRM system now uses links, OSLC UI Preview, and OSLC delegated dialogs to make it faster for support reps to find and create bugs.