In this section, we’ll add the ability to quickly preview linked resources to the NinaCRM sample application.
Introducing OSLC UI Preview
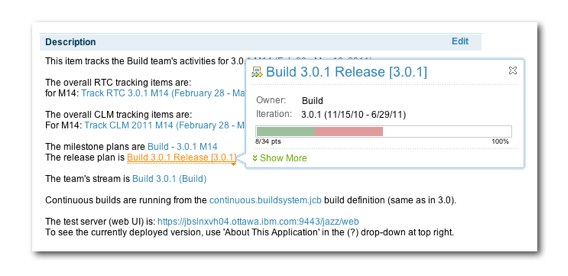
OSLC UI Previews makes it easy to show an in-context preview of a resource when a user “hovers” over the link to that resource, so the user can see what is at the other end and decide whether or not to click through to get more information. The illustration below shows UI Preview in action on IBM Rational’s Jazz.net site. A user has put his mouse-pointer over a link to a Build and a preview of that build has appeared on the screen:
Here’s how UI Preview works in an OSLC consumer:
- Start with a link to a resource.
- You send an HTTP GET request to that URL with an Accept header to indicate that you want the UI Preview representation.
- The OSLC Provider will respond with the Compact representation, which includes links to HTML previews.
- You send an HTTP GET for the small or large preview.
- The OSLC provider returns HTML that you can show to the user.
We explored the OSLC Provider side of this in more detail earlier in this tutorial.
Example XML for a UI preview
Here’s an example of the XML that an OSLC Provider will return when you request the UI Preview representation of a resource:
<?xml version="1.0" encoding="UTF-8"?>

<rdf:RDF
   xmlns:rdf="http://www.w3.org/1999/02/22-rdf-syntax-ns#"
   xmlns:dcterms="http://purl.org/dc/terms/"
   xmlns:oslc="http://open-services.net//ns/core#">
   <oslc:Compact
     rdf:about="http://localhost:8080/OSLC4JBugzilla/services/1/changeRequests/10">
     <dcterms:title>incidents common connexion</dcterms:title>
     <oslc:shortTitle>ChangeRequest 10</oslc:shortTitle>
     <oslc:icon rdf:resource="http://example.com/bugzilla/images/favicon.ico" />
     <oslc:smallPreview>
       <oslc:Preview>
         <oslc:document
           rdf:resource="http://localhost:8080/OSLC4JBugzilla/services/1/changeRequests/10/smallPreview" />
         <oslc:hintWidth>11em</oslc:hintWidth>
         <oslc:hintHeight>45em</oslc:hintHeight>
       </oslc:Preview>
   </oslc:smallPreview>
   <oslc:largePreview>
       <oslc:Preview>
         <oslc:document
           rdf:resource="http://localhost:8080/OSLC4JBugzilla/services/1/changeRequests/10/largePreview" />
         <oslc:hintWidth>20em</oslc:hintWidth>
         <oslc:hintHeight>45em</oslc:hintHeight>
       </oslc:Preview>
       </oslc:largePreview>
   </oslc:Compact>
</rdf:RDF>
The sample above includes both a small (<oslc:smallPreview>) and large (<oslc:largePreview>). Both have a document URI (rdf:resource) which is the location of the HTML version of the preview. Each preview also includes a width (oslc:hintWidth) and height (oslc:hintHeight) which tell you how much space you should give the preview in your web page.
Implementing OSLC UI Preview
Adding the ability to view UI Previews for links in an application can be done almost entirely with HTML and JavaScript code within web pages that display links.
First, we must provide a server-side proxy service. We’ll explain that first, then show how the HTML and JavaScript implementation works.
Working Around the Same Origin Policy with a Proxy Service
Anytime you display a link in a web page and you want to offer UI Preview for that link, you need to run some JavaScript to get the UI Preview representation of the link, parse the UI preview, and display a nice “tool tip” style popup that shows the UI Preview.
However, there’s a problem: for security reasons, JavaScript code running in a browser cannot call just any URL. Code can only call URLs that have the Same Origin, in other words URLs with the same hostname and port number as the page that hosts the code. Since we want to be able to preview resources at any URL, we need a way to get around this restriction.
One way to work around the Same Origin Policy is to set up a proxy service inside each application that needs it, and that’s how we’re going to approach it.
The NinaCRM application includes a simple proxy service; we won’t look at the proxy service in much detail. You can explore the source code in the file ProxyServlet.java in the org.eclipse.lyo.samples.ninacrm package. The service is mapped to the /proxy path and expects a uri parameter.
With the simple proxy service, you can send the URL http://example.com/anything/etc to the proxy with the following URL:
http://localhost:8181/ninacrm/proxy?uri=http://example.com/anything/etc
The proxy service will call the URL specified with the same method and headers as the original request and the return the results.
With a proxy service, we can now implement the rest of UI Previews in the browser.
Displaying Links to resources
Starting the NinaCRM sample application and the Bugzilla adapter.
Open http://localhost:8181/ninacrm/ in a web browser. You’ll see a sample incident:
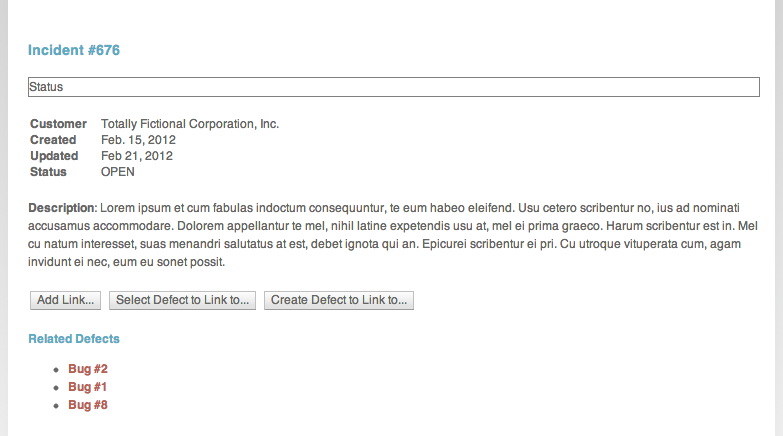
At the bottom, find the Related Defects heading. This is where we show links to related bugs in Bugzilla; the HTML is a simple unordered list:
<h3>Related Defects</h3>
<ul id="linkList">
    <li><a href="http://localhost:8080/OSLC4JBugzilla/services/1/changeRequests/2">Bug #2</a></li>
    <li><a href="http://localhost:8080/OSLC4JBugzilla/services/1/changeRequests/1">Bug #1</a></li>
    <li><a href="http://localhost:8080/OSLC4JBugzilla/services/1/changeRequests/8">Bug #8</a></li>
</ul>
Note that the URLs are to our Bugzilla adapter.
Without any JavaScript, this would function perfectly well to navigate to the linked bugs. However, we can enhance these links to provide a UI preview when you hover over them.
Showing UI Previews via Dojo Tooltip Widgets
Throughout this, we’ll be using the Dojo JavaScript toolkit to smooth out browser differences and build UI components like buttons and tooltips.
Open the file index.jsp in /src/main/webapp/ and search for dojo.addOnLoad(addPreviewMouseOverHandlers).
Here, when the page is done loading we use the dojo.query() method to get all the links on the page, and then for each link we add an event handler to run the showPreview() method when someone mouses over the link.
dojo.addOnLoad(addPreviewMouseOverHandlers);
var hostname ="localhost";

function addPreviewMouseOverHandlers() {
 dojo.query("a").forEach(function(elem) {
  elem.onmouseover = function() { showPreview(elem); };
 });
}
Here’s the showPreview() method:
function showPreview(elem) { // (1)
  var previewURI = elem.getAttribute("href"); // (2)
  if (!previewURI) return;
  dojo.xhrGet({  // (3)
    url: "http://"+hostname+":8181/ninacrm/proxy?uri=" + previewURI,
    handleAs:"xml",
    headers: {
      "Accept": "application/x-oslc-compact+xml", // (4)
    },
    load: function(data) {
      try {
        var previewData = parsePreview(data); // (5)
        var html = "<iframe src='" + previewData.uri + "' "; // (6)
        var w = previewData.width ? previewData.width : "30em";
        var h = previewData.height ? previewData.height : "10em";
        html += " style='border:0px; height:" + h + "; width:" + w + "'";
        html += "></iframe>";
        var tip = new dijit.Tooltip({label: html, connectId: elem}); // (7)
        tip.open(elem);
      } catch (e) { // (8)
        var tip = new dijit.Tooltip({label: "Error parsing", connectId: elem});
        tip.open(elem);
      }
    },
    error: function (error) {
      var tip = new dijit.Tooltip({label: "Preview not found", connectId: elem});
      tip.open(elem); // (9)
    }
  });
}
Here’s how it works:
- We pass the link as an argument
-
Retrieve the
hreffrom the link -
We then use the
dojo.xhrGet()method to request that URL using the proxy service. -
We pass a header with name
Acceptand valueapplication/x-oslc-compact+xmlto indicate that we want the UI Preview representation of the linked resource. -
When the data is returned, we parse it using the
parsePreview()method (discussed below) to retrieve the URL for the preview, the height, and the width. -
We start to build an HTML
<iframe>that displays the preview URL - We use the Dojo tooltip to show the preview.
We also account for errors in parsing the XML or if the link fails to load.
Here’s the parsePreview() method that we use to parse the XML:
function parsePreview(xml) { // (1)
  var ret = {};
  var compact = firstChild(firstChild(xml));
  var preview = firstChild(
    firstChildNamed(compact,'oslc:smallPreview')); // (2)
  if (preview) {
    var document = firstChildNamed(preview, 'oslc:document');
    if (document) ret.uri = document.getAttribute('rdf:resource');
    var height = firstChildNamed(preview, 'oslc:hintHeight');
    ret.height = height.textContent;
    var width = firstChildNamed(preview, 'oslc:hintWidth');
    ret.width = width.textContent;
  }
  return ret;
}

function firstChild(e) { // (3)
  for (x=0; x<e.childNodes.length; x++) {
    if (e.childNodes[x].nodeType == Node.ELEMENT_NODE) {
      return e.childNodes[x];
    }
  }
}

function firstChildNamed(e, nodeName) { // (4)
  for (x=0; x<e.childNodes.length; x++) {
    if (e.childNodes[x].nodeType == Node.ELEMENT_NODE
      && e.childNodes[x].nodeName == nodeName) {
      return e.childNodes[x];
    }
  }
}
And here’s how it works:
-
We pass the
parsePreview()method the XML data from the OSLC provider. -
We build and return an object (
ret) with the following properties:-
uri: the preview URL (note that this implementation only checks for theoslc:smallPreview; there could also be anoslc:largePreview) -
height: the hinted height for the preview -
width: the hinted width for the preview
-
The firstChild() and firstChildNamed() methods are simple tools to drill down into the XML and get to the nodes we care about.
Try it out!
If you’re running the sample applications, open http://localhost:8181/ninacrm/ in a web browser.
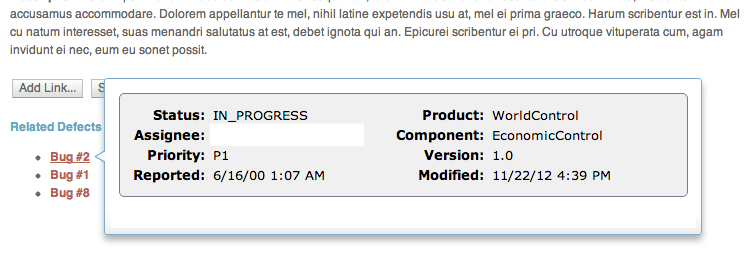
Hover over any of the Related Defects links. (You will probably have to log in with your Bugzilla username and password.) You should see a tooltip appear with the small preview of the bug:
Next up, we’ll explore how to use OSLC Delegated UIs to allow our support reps to both select and create new bugs in Bugzilla without leaving the NinaCRM application.